Heat Pump Installation and Monetization
Heat pumps are now cold-rated and so efficient they offer a competitive advantage over natural gas in a sealed, insulated home. This creates a business opportunity for rental housing early adopters. But like gas boilers, heat pumps have a host of technology and installation considerations. Because heat pumps are so different and immature, their problems will seem foreign to those of us familiar with fossil fuels.
The Charles Bado house in Turner Falls, profiled in our Deep Energy Retrofit Case Study, shows how heat pumps can be installed easily in gut renovation.
This article reviews the basic siting and maintenance considerations. It then looks at how owners are monetizing these systems in gut rehabs. Finally, we offer a long-term path for owners with existing, older housing stock to move in this direction. Much of the material in this article comes from Chaves Heating and Air Conditioning in Hudson, MA. Errors or omissions are our own.
Basic Anatomy
A heat pump has an exterior “condenser” that does the work and a “mini-split” or “head” inside the unit to exchange heat. Through the magic of thermodynamics, heat pumps can carry three to five times as much energy from inside to outside as it costs you to run the pump.
The refrigerant runs in a loop. When it’s freezing outside, the refrigerant is even colder and pulls heat from the freezing air to heat the building. When it’s hot outside, the refrigerant is even hotter and cools the building. The pump drives the fluid inside and outside over and over again in a cycle.
There are three primary connections. First, refrigeration plumbing runs from the condenser outside to the head inside. Second, drain plumbing runs from the head inside to the building’s drain stack or to the lawn outside. Third, electrical connections run from the breaker boxes to the condensers outside, and from there to the heads inside.
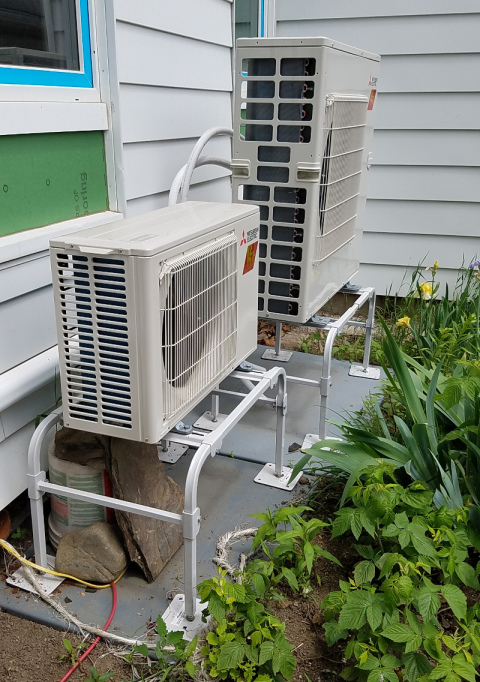
Exterior Siting
Air source heat pumps must be sited outside to exchange heat energy with the exterior air. Ideally there would be as little distance as possible from the condenser unit outside to the head inside. Like duct work and forced hot water, your effectiveness falls the longer you have to pump your working fluid.
Unlike forced hot water or air, whose pipes or ducts climb inside the building walls, heat pump refrigeration lines first run outside the building before entering the room. And unlike forced hot water, which can use tough PEX piping, refrigeration lines are soft copper and vulnerable to puncture, bad soldering, and impact.
Heat pump condensers may be installed on an exterior wall. Be careful if this is a bedroom wall. Depending on your building material and insulation, the heat pump condenser may resonate with the wall and create an impossible-to-ignore hum. Only attach the condensers to walls away from bedrooms. Best practice is to install on a flat roof. If you don’t have a flat roof, or if it’s not available, second best practice is to pour a concrete pad. In any kind of install, the heat pump would ideally be covered with its own lean-to to prevent snow and ice accumulation or falling icicle impact.
Interior Maintenance
Heat pump heads are difficult to site inside for three reasons.
First, you need each head pointed in such a way to move air effectively through your living space. If you have a square room, you can cover that effectively with a single head. As soon as you go around a corner or past a door that can close, you enter the territory of a second head.
Second, you need to be able to access the head with a flexible copper pipe. Dropped ceilings are a positive advantage for heat pumps. They permit the refrigeration lines to be run and maintained without tearing down your ceiling.
Third, you need to drain condensate away from the head. Heads installed on an exterior wall can drain outside. If you install a head on an interior wall, you will need to run PVC drain pipe down the wall. This usually requires opening the wall.
Flare connections from the refrigeration line to the head tend to leak over time. It’s best to have access to these via a dropped ceiling. If your ceiling is finished drywall, carefully cut a sheetrock section that you can later unscrew without additional cutting or dust.
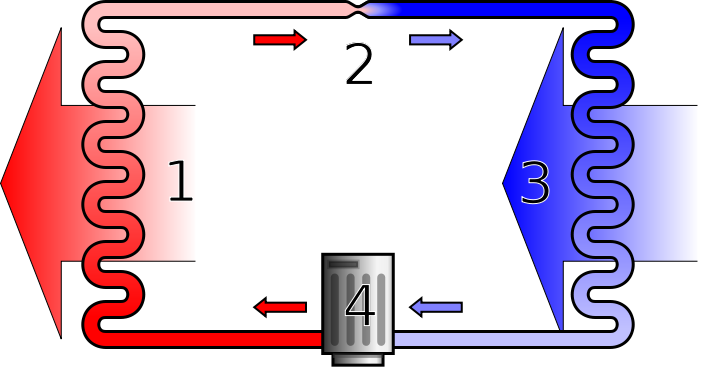
Heat pumps operate in four phases. 1. Hot refrigerant moves through a heat exchanger inside, heating the room. 2. The refrigerant goes through an expansion valve/plate, which decreases the temperature. 3.) Cold refrigerant moves through a heat exchanger outside, gathering heat from even sub-zero air. 4.) Electrical energy is supplied to pressurize the refrigerant and increase its temperature. The cycle repeats or runs backwards to provide air conditioning. Ilmari Karonen CC-0
Heat Pump Thermodynamics
A twenty-year-old boiler or furnace might produce 80,000 or 100,000 BTU, which at the time the system was installed, might have been the smallest size available. A residential heat pump condenser will max out at 30,000 BTU. There is little overlap in BTU sizes. This means you would need three maximum-sized condensers to get the same power output as one 20-year old boiler. Since a single 30,000 BTU mini-split system costs roughly as much as an 80,000 combined high efficiency boiler, mini-splits appear cost-prohibitive, all else being equal.
All else is not equal, however, where insulation and air sealing come into play. With a well-insulated and tight building, the BTU’s required to maintain temperature on a cold day are far below minimum furnace and boiler sizes. A single heat pump condenser can theoretically manage the job alone. Placement is key, or else parts of the house may not meet sanitary code requirements for temperature. Several smaller systems might perform better for the same cost. Suffice it to say, insulation and air-sealing should be considered requirements where heat pumps are to be the sole source of heating.
Why Bother: A New Paradigm
Existing rental housing stock typically looks like this: powerful gas furnaces or boilers provide heat in lightly insulated or uninsulated buildings. Renters pay for the gas. The building produces carbon emissions. Your economics are dependent on gas continuing to remain cheap. Renters in very badly insulated buildings may move to housing that’s easier to heat.
Instead of this, consider that you can now heat and cool for free: Heat pumps are now rated capable of being the sole source of heating and cooling in New England, amid all forecast exterior temperatures. The heat pumps can be powered by free solar power from the roof. Your renters will pay heat based on market cost of heating, even though for you the marginal cost of the electricity will be zero (once installed, solar is free). By eliminating your boilers, furnaces, chimneys, and fossil fuels, you will be efficient, have lower maintenance costs, be protected against Lawrence-level gas explosions, and eliminate any exposure to future climate policy (e.g., carbon tax). There are a lot of benefits to considering this transition to heat pumps.
How to Monetize Heat Pumps as the Sole Source of Heat
Absent any existing building constraints, here is a generic process to get from fossil fuel use to heat pumps.
First, insulate and air-seal with foam. This means gutting the interior or stripping and replacing the exterior. (The MassSave blow-in insulation will not be adequate.)
Second, decide what to do with the chimney. You can remove or block the chimney for maximum air tightness. Or you can keep the chimney and consider your natural gas boiler or furnace a “backup” heat source.
Third, install heat pumps adequate for the space given your new insulation.
Fourth, establish rental agreements that return on your investment. For instance, you might rent the finished units with the renter paying for utilities, in this case, primarily electrical. You would then keep the meters in your name and bill the renters for their actual usage. Your solar panels will feed the owner meter and generate net metering credits, which you can reassign to the units in that building (same load zone) by electrical account. The credits and the renter billing offer two routes to recover the cost of the solar and heat pump installation. See our full article, Can Massachusetts Landlords Charge For Solar?
(On this last point, we wish we had guidance from DPU clarifying that this arrangement was compliant, but we believe it is, and that it serves the public interest by covering a shortcoming of the SMART program for solar credits where rental properties are concerned. Let us know if there are better monetizations.)
Challenges Getting from Here to There
There are four physical things you need to do to make this work: get solar panels for free power, get heat pumps for heating and cooling, deactivate the gas equipment, and seal and insulate the building very well. Getting all four in place is best done simultaneously, and for older buildings, presents a special challenge.
You can’t install just the heat pumps first. If you start with only the heat pumps, you will not have the insulation you need to heat or cool effectively. Your condensers will be oversized to start and possibly still inadequate. Then, when you eventually insulate, you may need to redo the heat pump installation. The exterior piping can’t be left in place for an exterior insulation job. It will have to come off and be reinstalled. You may want smaller, more efficient condensers post-insulation, as well.
You can’t start with just solar panels. If you start with just the solar power and no heat pumps, you won’t have the electrical load you need to realize your projected return on investment for the panels.
You probably can’t start with just foam insulation. If you start with just the insulation and sealing, you will choke your older furnaces and boilers and/or create a fresh air problem. You may need to pay for an expensive make-up air system. Make-up air can increase the likelihood of a frozen basement.
The recommended advice is therefore to save this “giant leap” for a gut rehab, where all can be done at once, or in new construction.
How to Transition Gradually from Gas to Heat Pumps
For an owner with older housing stock, there is a path to move gradually toward heat pumps, but it’s a long one (think ten or more years).
Phase One: The Chimney
Start by eliminating usage of your chimney. Each time a boiler dies, replace it with a high efficiency combination boiler/furnace and water heater. These breathe and vent through PVC in the side of the building. They do not require make-up air that chills your basement. There are programs like MassSave that will eliminate a large amount of cost for anything that reaches 30 years in age. Each year, these programs change, so check after January 1 to see if there is a better replacement program for you.
After years of gradual replacements, when your chimney is no longer needed, you will have cleared the make-up air problem. You can now cap your chimney and air-seal.
Capping or removing the chimney will greatly eliminate your frozen pipe risk and your air leakage.
Phase Two: Foam Insulation and Air-Sealing
Once your mechanicals breathe through dedicated air pipes, sealing and insulating the building with foam is possible. This will reduce the BTU’s required to heat and cool.
You can insulate from inside each unit, or if you want to be the most thorough, do it from the outside: strip off the old siding, spray in foam insulation, and install structural insulated panel. If using closed cell foam, which dries hard as concrete, install the largest possible through-wall pipe chase ways for future heat pumps to get from outside to inside. You don’t need to install the heat pumps now. You can fill the void with open cell foam. Just mark each chase location carefully for later.
Once your insulation is in place and known to be working well, save up for the next round of improvements. This phase is monetizable, as renters may be willing to pay more for a well-insulated and sealed apartment with lower than average heating costs.
Phase Three: Heat Pumps
Once you have insulation and air-sealing, you are ready to install heat pumps. You will have reduced your carbon footprint and your costs a lot at this point already. You will also have made it cost feasible to run residential heat pumps off the grid.
This phase is monetizable, as renters may be willing to pay more for the option of air conditioning, which heat pumps provide.
Phase Four: Solar
Once you have your heat pumps, look at your actual electrical usage across all units and install solar panels to the owner meter. Collect the credits and bill renters for electrical. They will still have the incentive to conserve energy, and you will have multiple ways to recover the capital outlay for the panels, including the solar production, SMART credits, and renter utility bills. At this point, you will have eliminated your carbon footprint and hopefully monetized the upgrades as they came online.
Heat Pump Conclusion
Heat pumps coupled with solar panels offer planet-saving and business-altering potential. But their installation is problematic for an older building. Adequately capitalized new construction and gut renovation should consider forgoing any fossil fuels and implementing all four heat pump implementation phases at once. Older buildings can use our phased approach to renovate over years and monetize each step along the way. Subsidy from the government would go a long way to accelerating adoption of this promising new technology.
Like this article? Did we get something wrong? Email us, hello@masslandlords.net.
Members can talk to experienced landlords about their heat pump journeys using our email and Facebook message boards.
